Feeds:
Posts
Comments

Archive for September, 2010

Every year around September, Billy of Billy’s Gardens, who sells at most of our local farmers markets, offers a deal on #2 tomatoes in bulk: a 20-pound box for $25.  I generally get a box to help feed my tomato addiction through the winter.  Other vendors also offer discounts on tomatoes if you buy in bulk, although that may be more challenging with the cold weather we’ve had this year, and its effects on the tomato harvest.

The easiest way to store these tomatoes for cooking is something Billy taught me: Freeze them.  Throw the tomatoes whole into a bag or container, and stick them in the freezer.  When you’re ready to cook with one, pull it out, set it in a bowl of hot water for a few minutes, pull the peel off, and throw it into your pot.

But the last two summers, I’ve turned my bulk tomatoes into a roasted tomato sauce.  The sauce can be frozen to last through the winter.

Roasted tomato sauce develops a sweet, rich flavor.  An added benefit is that the liquid which seeps out of the tomatoes can be poured off to and used as a wonderful soup base.

Here are the general directions for the sauce and the stock:
~

Roasted Tomato Sauce

(and Tomato-Liquid Soup Stock)

yields 10 pints

  • 20 pounds of tomatoes
  • garlic to taste (I think I used 3-4 heads)
  • salt to taste
  • pepper to taste
  • olive oil

1. Preheat oven to 375F

2. Wash tomatoes.  Arrange them in deep baking dishes.  Three large, rectangular Pyrex baking dishes, or two large ones and two small ones, should do it.

3. Peel garlic.  Intersperse the garlic cloves with the tomatoes.

4. Sprinkle salt, pepper and olive oil all over the tomatoes and garlic.

5. Roast for about an hour and a half, or till tomatoes are falling-apart-soft.  If tops are drying out, spoon some of the liquid that is building up over the tomatoes.

6.  Pour the liquid that has accumulated into a jar or jars and save it (fridge or freezer) for soup-making purposes.  It’s rich and tasty, a great broth for soups involving things like eggs, parmesan, vegetables, lamb or beans.

5. Pour remaining tomatoes and garlic into a pot (I had to use two and you probably will too).  Immersion blend them (or process in a food processor).  Taste and adjust salt.  Cook on the stovetop on low for 30-45 more minutes until it has a rich, fully-developed flavor.

6. Freeze the sauce. (I canned the sauce in the past before I realized canning guidelines for tomato products require a certain acidity level and use of a formally tested recipe such as this one or recipes through USDA or university cooperative extension programs.) You can freeze it in jars or in ziplock freezer bags. This is easiest if you cool it first. The fastest way I’ve found to cool it is to pour all the hot sauce into a thin pot that hasn’t been sitting on the stove, and then to set that pot in a sink full of ice water that isn’t deep enough to come over the rim. Once the pot has cooled a fair bit, put it in the fridge on a coaster. The next day, ladle the refrigerated sauce into your preferred freezer containers and freeze.

Read Full Post »

Fake Farmers Markets??!

Just read an article at Grist about grocery chains (Safeway, Albertson’s) in the Pacific Northwest setting up fake farmers markets full of their own (non-local) produce.  That’s pretty creepy.

Some supermarkets, like the Grocery Outlet on Union and MLK, do host farmers markets in their parking lots, on the theory that it brings them customers, they have the space, and it’s something good to do for the community.

This is not the same thing.

It’s sad that companies, and the marketing staff of companies in particular, can get so caught up in the single-minded goal of selling a product that they’re comfortable misleading customers into buying something we don’t want.  It’s not a way to build long-term trust or keep long-term customers.

Has anyone seen this?

Full article here.

Read Full Post »

Events from City Fruit (forwarded via CAGJ).  Want to know what to do with green tomatoes?  That one caught my eye.  If I don’t make the class, I’m going to be working on some of my own recipes, thanks to Seattle’s charming lack of proper-length summer this year..

~~~~

What to Do with Green Tomatoes?

Saturday, October 2, 2-3 pm

Jackson Place Cohousing: 800 Hiawatha Pl. SE. Seattle, WA

If you’re a northwest gardener, you’ve got ‘em—green tomatoes that didn’t ripen before cool weather set in.  Come learn creative ways to use the last of your tomato harvest, no ripening required!  Turn your green tomatoes into relishes, bake with them, or just cook up some simple recipes for dinner.  And if you can’t cook up all your green tomatoes, learn how to ripen them off-the-vine.  Instructor Kristin Danielson-Wong brings over 20 years of experience in food preserving and teaching, and she just might like green tomatoes better than red. $15 members, $20 non-members.

Register at https://www.brownpapertickets.com/event/130512 or send a check to City Fruit, PO Box 28577  Seattle 98118.

Planting and Caring for Young Fruit Trees

October 9, 10 am-12 pm

Bradner Gardens Park Classroom: 1750 S Bradner Pl, Seattle, WA

Fall is planting time! Plant your tree before the ground gets hard and get a head start on your fruit.  By using good planting, watering, and pruning techniques, and learning to recognize problems, you can give young trees the best chance to become healthy and productive. The class covers site selection, fruit tree selection (how large? What type?), where to buy fruit trees, how to plant them and how to care for young trees.  Jana Dilley works on the Green Seattle Initiative with the City of Seattle Office of Sustainability and Environment.  She has a master’s degree in Forestry and in Public Affairs and has organized community tree-planting events in Seattle and California. $15 members, $20 non-members.

Register at https://www.brownpapertickets.com/event/114585 or send a check to City Fruit, PO Box 28577  Seattle 98118.

Canning Basics: Plum Jam

Sunday, October 10, 2:00-4:30 p.m.

Greenwood Senior Center: 525 N. 85th St. Seattle, WA

Canning is the premier way to preserve fall’s harvest at home, whether from your own yard or the market.  In this class, you’ll learn tips and techniques to can safely and successfully at home, so you can preserve the season to enjoy all year long.  Taste some plum jam made while you watch from City Fruit’s harvest.  Instructor Shannon Bailey is a local canning expert who has taught many workshops on food preservation. $15 members, $20 non-members.

Register at https://www.brownpapertickets.com/event/130544 or send a check to City Fruit, PO Box 28577  Seattle 98118.

Homemade Harvest Pies

Saturday, October 23, 1-3:30 pm

Jackson Place Cohousing: 800 Hiawatha Pl. S. Seattle, WA

It’s time to turn your fruit harvest (or your favorite farmer’s) into homemade pies, for special occasions or an everyday treat. Our instructor Tracey Bernal has worked as a pastry chef and cook at Campagne, Café Septieme, the Palace Kitchen and the Dahlia Bakery.  Tracey will cover methods and recipes for crusts and fillings, including reading recommendations.  She’ll also show you make-ahead methods for fillings and crusts and how to put up fruits for pie fillings.  Don’t miss this rare opportunity to learn from a true culinary professional for an affordable price. $15 members, $20 non-members.

Register at https://www.brownpapertickets.com/event/130802 or send a check to City Fruit, PO Box 28577  Seattle 98118.

Read Full Post »

We’ve covered a few different ways to preserve or cook salmon, like making gravlax and broiling fresh salmon.

I finally got to experiment with another salmon treatment I’d been wanting to try: Ceviche.

Ceviche is a Central and South American dish, a way to cure raw fish using lime juice, a bit of salt, and other flavors like tomato, onion, cilantro, chilis, and vegetables. It’s a much quicker cure than gravlax; gravlax takes two days, whereas ceviche is cured and ready to eat in three or four hours.

The impetus for this ceviche came from something the guys at Wilson Fish sell at the farmers markets where they vend. They have little bags of salmon bits they call spoonings, the fatty, delicious parts scraped off the backbone after filleting. I use them for coconut milk curries most of the time, but wanted to try something new.

Like salsa, ceviche does not follow an exact recipe.  My recipe was pretty unplanned. Juice of one lime wasn’t enough for the 1/3 pound of salmon bits, so I did two. Salt to taste. Two cloves of garlic chopped fine, half a sweet onion, a large tomato, a handful of cilantro, a lemon cucumber, a few hot chilis. It was what I had in the fridge that sounded like it would go in ceviche. Experiment with other ingredients on your own. Halibut would also taste great (and is a bit more traditional), and so would cod or other white fish.

~

Salmon Ceviche

  • 1/3 salmon (sushi-grade, very fresh, or pre-frozen good quality and thawed)
  • 1 very ripe tomato
  • 2 limes
  • handful of cilantro, chopped
  • 1/2 sweet onion, chopped fine
  • 2 cloves or more garlic, chopped fine
  • 1-2 hot peppers, chopped fine (hold the stem and use a scissors to cut into your bowl, to avoid getting oil on your hands)
  • 1 lemon cucumber
  • salt to taste

1. Chop salmon into bite-sized pieces.

2. Chop all other ingredients fine.  Combine with salt and lime juice.

3. Refrigerate at least 3-4 hours or overnight.
~

We're Competing badge

Read Full Post »

Salmon: Does food get much better?  Salmon is fatty, full of vitamins and omega-3s, flavorful. It’s local and traditional in the Northwest. It’s fast and easy to cook.

And yet there are so many ways salmon can go wrong. There’s farmed salmon, whose failings have been detailed plenty of other places. There’s old salmon, tragically not eaten while it was fresh. And then there’s overcooked salmon, a chewy, dry reminder of what it could have been. Breaks my fish-fond heart.

I credit my perfectionist-scientist mother with my salmon-cooking skills. We spent summers in Seattle when I was a kid, where my mother, standing at the little Habachi grill (which I think was $5 at Pay ‘n’ Save?), or at the oven set to broil, produced perfect salmon with the same meticulous attention she applies to research. Flaky, flavorful, moist. We ate it with Northwest vegetables, homemade tomato sauce, blackberry pie, leaving permanent Northwest flavor imprints in my memory.  The salmon even converted salmon-haters like my friend Ellie, who had never liked salmon until my mother made it for her the night Ellie and I met, when she was ten.

The secrets lie in selecting the salmon carefully, and serving it very slightly underdone.

.

Selecting Salmon

~ Choose salmon that is very fresh. Ask when it was caught. It should look firm and bright, not dull. It shouldn’t smell funny. Buy from a reliable vendor. I love the fish from Wilson Fish at the Ballard, Wallingford and Madrona farmers markets, and Loki’s stuff is also good. There are great vendors down at Pike Place. I’ve had some luck at Madison Market and at Mutual Fish on Rainier.

~ Choose belly fillets (the one that’s thick on one side and thin on the other) as opposed to tails. Belly has more fat and the thickness gives the fish better consistency. King is the fattiest and best, but is also expensive. Go for as thick and high-fat as you can find/afford.

~ Look for nice, pronounced fat lines

~ Buy wild salmon

~ Fresh is better than frozen. Fresh has better consistency. Frozen is okay if you can’t get fresh.

~ Alaska, BC and Washington have more sustainable salmon fisheries than other locations

.

How to Cook Salmon (but NOT overcook salmon)

Salmon on a grill is still the best. If you’re doing that, follow the directions below for doneness and seasonings. Cook it face-down first, so the fat from the skin soaks into the meat. Then, flip and let it cook until it’s done, while letting the skin get a bit grilled for added deliciousness. Get one of those cage-like fish-flipping devices; it’s a good investment to make this process easier.

This recipe is for salmon in your oven set to broil.  It’s easy and comes out great.

  • 1 fillet of salmon, preferably belly.
  • olive oil
  • optional toppings (not too much): lemon juice, olive oil, black pepper, smoked paprika, fresh tarragon, fresh garlic sliced thinly

1. Set broiler to high and position rack right under the flame at the top of the oven.

2. Line a baking dish or oven-proof skillet with aluminum foil.  (You can skip the foil if you don’t mind serious scrubbing).  Place salmon on the foil.  It’s okay if the thinner side is a little folded, so it doesn’t dry out.  This helps you get away with using a slightly-too-small pan, too.

(ADDED NOTE: You can place the salmon one of two ways: 1. You can use my original recipe here, which cooks the salmon cut side up the whole way. 2. Alternatively, you can start with the skin side up to crisp the skin for maybe two minutes and then flip the fish after two minutes. I recommend starting with the simple way and then experimenting with the other one if you like the original recipe.)

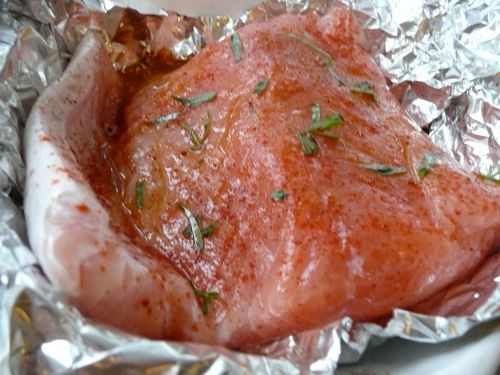
3. Drizzle with olive oil.  Add on bits of other toppings if you like.  You don’t need much, because salmon is so flavorful on its own, but a bit of smoked paprika can be nice, as are any of the flavors listed above.  If using herbs like tarragon, press them down into the oil coating the fish.

4. Set under the broiler.  Check frequently.  Estimates vary between 7-10 minutes per inch of thickness, but I prefer to watch it.

Here’s how to tell it’s done:

~ The top is slightly brown and/or tiny bits sticking up get a little charred

~ A little whiteness appears at the sides from the fat

~ When a wooden spoon pressed on top gives back a little resistance but not too much

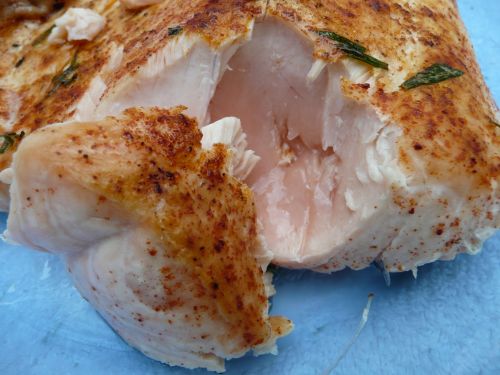
~ And the MOST IMPORTANT: cut into the thickest part.  At the bottom, you should have some translucent, raw-looking fish. BUT!  This fish is easily parted with a butter knife.  If there’s raw-looking salmon that can’t be teased apart with a butter knife, it needs another moment. If it can, DO NOT cook the salmon any longer!  The fish is moistest and most delicious when you leave this translucent area as so.

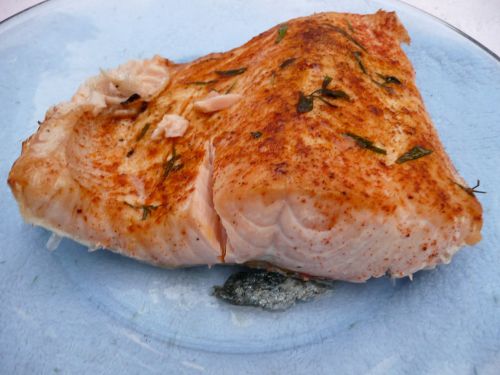
Photo evidence: This salmon is perfectly done!  That translucency is your friend!

Serve salmon simply with a side of steamed vegetables and butter, or with some vehicle for homemade tomato sauce, or whatever you like with salmon. Remember also that the skin is delicious and full of nutrients.  If it’s too chewy for you, fry or broil it on its own a bit until crispier.

We're Competing badge

Read Full Post »

I grew up in New York.  My soul food is: bagels with scallion cream cheese, whitefish, and nova salmon.  Pastrami on rye with mustard.  Deli-style tuna salad, nearly puréed.  Half sour pickles.  Heavily-seeded rye bread.

Most of this, I can’t get on a daily basis.  For starters, there is no decent whitefish in Seattle.  I’m gluten intolerant and try to eat high-fat/low-carb when I’m eating optimally, so not so much on the bread (except for treats or NYC visits).  I do make my own pickles, and the I Heart NY Deli on Roosevelt has pretty great pastrami.  But there are foods I miss.

Surprisingly, tuna salad is one of those foods.  That New York deli style tuna salad is different somehow.  I’ve spent years trying to replicate the tuna salad at a little schmancy foods store in Manhattan called Todaro Bros.  It’s puréed with [lots of lemon juice] [Edited 2014: Apparently no lemon juice, according to the store, but I like it anyway], good quality mayonnaise, and finely grated carrots and celery. I still go out of my way when I visit New York to get to Todaro’s and eat some.

But the holy grail tuna salad in New York is something called smoked tuna salad. Tangy, smokey, a little orange, and utterly addictive. Not easy to find; I found the perfect one once in some obscure little deli in midtown and never found anything as good since, although plenty of delis carry a version. It’s been probably seventeen years since that perfect smoked tuna salad, and I still can’t get the taste out of my head.

I’ve tried to replicate it, like the Todaro tuna.  I’ve used actual good quality wood-smoked tuna from the St Jude tuna guys at the farmers market here (they also have great canned tuna).  I’ve used regular tuna with smoked paprika.  I’ve failed.  A special-association taste is hard to fake.  Your tongue knows when you’ve gotten it wrong.

Today, I got it right… by accident.

I was making lunch for a bunch of people building a sukkah.  I thought I’d purée the tuna salad quickly in the food processor, with homemade mayonnaise and grated carrots, going for my best shot at that Todaro tuna.  Then I realized I’d put in too much mayo for the tuna, and didn’t have another can.  While a friend ran to grab me another from her house, I impulsively threw in some leftover Loki chunk smoked salmon from the freezer.

The secret revealed.

Okay.  It’s possible this isn’t what delis do to make smoked tuna salad.  But I think it is.  Reason 1: it’s the same color, a little more orange than tuna salad.  Actual smoked tuna isn’t that color.  Reason 2: Smoked salmon is much easier to find in New York than smoked tuna.  Reason 3: It tastes exactly right.

If you’ve never had New York deli style smoked tuna salad, or if you crave it from 3,000 miles away, try out this recipe and tell me what you think.  You can get nearly all the ingredients from local producers (aside from lemons): canned tuna, smoked salmon, carrots, optional celery.  It would make an amazing tuna melt, or just a good lunch with some vegetables, tomatoes, cheese and lettuce.

~

Smoked Tuna Salad, New York Deli Style

Proportions are variable according to your taste.  Final product should be fairly smooth, puréed with texture and not liquidy.

  • 1/2 cup to 1 cup smoked salmon (not lox — West Coast chunk style)
  • 1-2 cans of tuna
  • 3-5 tablespoons of homemade mayonnaise (link is for my older bowl recipe… I’ll give you the food processor recipe below)
  • juice of 1 lemon
  • 1-2 carrots
  • 1 stalk of celery (optional)
  • pinch of salt
  • herbs or spices to your taste.  However, they’re not really necessary with this version.

1. Make mayonnaise and set aside

2. Grate carrots and celery finely.  The easiest thing is to attach a grating top blade to a food processor and grate them right into the food processor body, in which you’ll make the tuna.

3. Add to carrots and celery: tuna, salmon, mayonnaise, lemon juice and salt.  Start with the lesser end of the mayonnaise, and you can always add more.

4. Pulse food processor as it combines ingredients.  Add more mayonnaise as needed.  Keep pulsing until puréed with a textured consistency and not liquidy.

Homemade mayonnaise

The linked directions above work great for a bowl.  This is the food processor version.  Note that it contains a whole egg, whereas bowl mayonnaise contains just a yolk.

  • 1 egg
  • juice of 1/2 lemon or 1-2 tablespoons apple cider vinegar
  • pinch of salt
  • 1 tablespoon of mustard
  • 1 cup of olive oil
  • saffron, basil, garlic, or other flavors as desired

1. In bowl of food processor crack egg, add lemon juice or vinegar, salt, mustard, and any flavors.  Pulse a few times.

2. Add top to food processor but leave open the space where you can pour things in while the food processor is running.

3. Measure out your cup of olive oil.  With the food processor running, SLOWLY pour the olive oil in, in a very thin, steady stream.  If you pour too much, take a break and let it emulsify.  Keep going until you’re out of oil.  You have mayonnaise.

We're Competing badge

Read Full Post »

Okay, I’ve been storing up so many events and resources to post about, I’d better get them all down in a post.  I’m sure I’m missing a few I meant to include, so I’ll post again if and when I find them.

~~~~~~~~~~~~~~~~~~~~~~~~~~~~~~~~~~

The Eat Local Now! collaborative is putting on the annual Eat Local Now celebration dinner!  This is a great event and supports a group strengthening and promoting sustainable food systems in Cascadia. You can buy tickets here.

7th Annual Eat Local Now! Dinner
September 30th, 2010
Herban Feast’s Sodo Park  ~ 3200 1st Ave South; Seattle, Washington 98134

This vibrant and successful fundraising dinner celebrates involvement in and cultivation of our local food economy. We advocate for access to locally grown foods for all income and social groups and seek to strengthen the local food economy by supporting local food businesses.

The Eat Local Now! Dinner offers a vital community space for individuals to share their stories, time for food and garden inspired activities, and a delicious community dinner featuring fresh food grown or produced in Washington, prepared by inspired local chefs.

~~~~~~~~~~~~~~~~~~~~~~~~~~~~~~~~~~

Sustainable Food Jobs Resource Website
Looking for jobs (or looking to advertise jobs) around the country having to do with food and sustainability?  Just heard about this website that lists them:  http://sustainablefoodjobs.wordpress.com/

~~~~~~~~~~~~~~~~~~~~~~~~~~~~~~~~~~

Free UW Food Lecture Series!  Eating Your Environment
The University of Washington is offering a remarkable series of lectures about food this quarter.  Open to the public, UW students can also take these for UW credit.
Tuesday nights at 6:30, Kane Hall, starting October 5th.  Don’t miss this.

http://depts.washington.edu/poeweb/news/foodseries.html


~~~~~~~~~~~~~~~~~~~~~~~~~~~~~~~~~~

I caved and created a Twitter feed.  It’s http://twitter.com/sealocalfood  .  I kind of hate Twitter, but I know some people like it.  Do people just find my feed on their own?  I don’t really understand this crazy interwebs business, apparently.
~~~~~~~~~~~~~~~~~~~~~~~~~~~~~~~~~~

SLICE 2010

October 23rd

Seattle Central Community College

SLICE ( Strengthening Local Independent Cooperatives Everywhere) is our region’s 2nd annual cooperative business conference. If you’re currently part of a co-op business, are starting one, or just want to learn more about how the co-op business model can help build an economy that is more just and economically sustainable, this conference is for you! Co-presented by Central Co-op and Seattle Good Business Network, the conference will feature national and regional speakers, workshops, and great food! Details and tickets at slice.coop.

~~~~~~~~~~~~~~~~~~~~~~~~~~~~~~~~~~

Urban Agriculture Victory at Atlantic City Nursery

Great news from Urban Farm Hub about the City of Seattle’s Atlantic City Nursery site. It seems the Parks Board Commissioners have agreed that future use of the site should include urban agriculture. It’s been a good year for Seattle’s process of becoming more urban-farm-friendly!

~~~~~~~~~~~~~~~~~~~~~~~~~~~~~~~~~~


1st Annual Pike Place Market Artisan Food Festival

For more information:  www.pikeplacemarketfoundation.org & www.artisanfoodfestival.org

On September 25th and 26th, the Pike Place Market Foundation will host the first annual Pike Place Market Artisan Food Festival. Hours will be 10:00 AM to 6:00 PM Saturday and 10:00 – 5:00 Sunday.

The 2010 Artisan Food Festival will be modeled after Salone Del Gusto, the popular festival in Torino, Italy and feature outdoor ‘pavilions’ with the following themes: beer, wine, bread & cheese, coffee & tea, meat,  chocolate, vegetables, sustainability, and crafts.  It will also feature chef demonstrations, live music, children’s activities, and beer and wine gardens – something for all interests and ages.

The Festival is produced by the Market Foundation.  Proceeds will benefit the low-income clients who rely on the Market’s four human service agencies – the Clinic, Preschool, Senior Center, and Food Bank.

~~~~~~~~~~~~~~~~~~~~~~~~~~~~~~~~~~


Hazon Food Conference 2010

I attended the Hazon Food Conference last year.  Hazon is an organization dedicated to making a healthier and more sustainable Jewish community and world overall.  They focus largely on sustainable food.  Their conference this year looks interesting and worthwhile; check it out, if the intersection of Jewish culture and sustainability is something important to you.

December 23-26, 2010

Walker Creek Ranch
Sonoma County, CA

[From their website] The Hazon Food Conference is a unique gathering that will bring together 200 professionals, lay leaders, and foodies to connect, collaborate, and continue to build the New Jewish Food Movement.  The Conference will provide in-depth sessions that willstrengthen and expand participants’ knowledge of Jewish thought on food, agriculture, and consumption, as well as opportunities to build community with regional cohorts and professionals of similar backgrounds.

Programming will include

  • Exploring the rich tradition of Jewish thought on food, agriculture, and consumption
  • Examining the Jewish community’s role to create a socially and economically-just and environmentally-sound food system
  • Networking and regional gatherings for farmers, educators, activists, chefs, entrepreneurs, and other groups of people to collaborate and establish action plans
  • Celebrating a joyous Shabbat

More information is available here.

~~~~~~~~~~~~~~~~~~~~~~~~~~~~~~~~~~


We're Competing badge

Read Full Post »

Updated to add: Thanks to Laura for the screen shot!

So, I had no idea that Google ads appear at the bottom of my blog.  I’m fairly new to WordPress, and I use Adblock on my web browsers.  I guess it’s how WordPress makes money.

Reader Laura cracked up when she got to the end of my last post (about high fructose corn syrup changing its name) and found one of the Google ads was from the Sweet Surprise people themselves!  Oy.

I don’t think they’re going to get any business off this blog, somehow.  I can’t decide if this is creepy or hilarious.  Probably both.

If any of you saw this too let me know!

We're Competing badge

Read Full Post »

Sometimes, I’d rather not be right.

Years ago, I wrote a blog entry about how manipulatively renaming detrimental ingredients can trick consumers into eating things they don’t want.  I was thinking about the term “organic evaporated cane juice” and how it’s simply a way to encourage people to eat sugar who might otherwise hesitate.

I suggested that, while we’re at it, why not rename high fructose corn syrup something like fructose-infused zea mays nectar?  Make softly lit ads with kittens and puppies getting along?

A few months later, the Corn Refiners Association began their infamous Sweet Surprise campaign, and I thought my prediction had come true.  No kittens and puppies, but pictures of (healthy, happy, multiracial) children getting along while eating popsicles.

Now, they’ve taken my original advice. The CRA has petitioned the FDA to get “corn sugar” approved as the new term. (Was fructose-infused zea mays nectar to long? Sorry about that!).

No sugar is good for you, although I choose to have a little now and then for the sake of occasional baked goods.  But HFCS is extra bad.  It plays a role in obesity, sure, but it seems specifically to induce symptoms of metabolic syndrom (fatty liver, insulin resistance, hypertension, heart disease…) even without obesity.

This is pretty insidious.  The only reason to make the change is that people are making specific, conscious choices not to eat the stuff.  A name change will trick people into eating what they don’t want.

That kind of manipulation is responsible for a whole lot of unhealthy eating in this country. I was listening to a call-in show on NPR not too long ago, hearing some guy rant about how insurance shouldn’t cover anything to do with metabolic disease and obesity because people “make bad choices.”  That kind of attitude is maddening in a world where these sorts of marketing manipulations happen all the time.

The name change is creepy.  But on the other hand, maybe people are catching on to the constant swapping of names and hiding of ingredients.  Since all sugar has detrimental metabolic effects, wouldn’t it be nice if any kind of sugar on the label made people hesitate as long as “high fructose corn syrup” tends to?  But then, manufacturers would probably just switch the name to something else.

I’m glad the label isn’t going to change on the tomatoes, beef, plums, beans, etc I buy at the market.  It’s harder to pull the wool over your eyes when you cook from simple ingredients.  But marketing is very difficult to resist, as are time-saving foods.  I may not like packaged foods, but people do choose to eat them (or feel it’s their only choice).  And as long as people eat them, it’s important to advocate for accurate, non-manipulative labeling and marketing.

We're Competing badge

Read Full Post »

Fruit Fly Trap!

They’re back, and they want my tomatoes.

I don’t give my tomatoes up easily, so these fruit flies have crossed a line.  Time for another fruit fly trap.

Many fruit-loving households have considered what to do with fruit flies.  A former roommate and I joked about packaging them up for a friend of hers running drosophila experiments in the lab.

But this trap is actually the best solution I know.  I learned it from someone else, who learned it from someone else, and I’ve modified it over the years.

It’s very simple:

~

Easy Fruit Fly Trap

Materials:

  • 1 yogurt container, preferably quart-size
  • A small piece of waxed paper or plastic wrap
  • A knife or scissors for cutting the top
  • A fork or sharp knife or pen for poking little holes
  • Some rotting fruit
  • A little honey

1. Take a plastic yogurt container, quart-size preferably.

2. Cut a circle out of most of the lid, so the lid still fits around the edges of the container but the top part of the lid is gone.

3. Fill the container with old, molding, fruit that’s been cut up or mashed a bit.  (Note: While you do the next steps, some fruit flies will save you trouble by flying into the container to investigate the fruit, and waiting in there.)

4. Get a piece of waxed paper (you can use plastic wrap too but I like waxed best because it’s stiffer, smooth, and biodegradable).

5. In a small area of the waxed paper, about the size of the opening of the yogurt container, punch small holes, with the ends of a fork, a pen, or a fine-pointed knife.  They should be, you know, fruit-fly sized holes.

6. On the underside of the waxed paper, drizzle a bit of honey.  You don’t need much.

7. Place the waxed paper with holes, honey side down, gently over the yogurt container.  Use the cut lid-band to secure it in place.  Place it wherever fruit flies are trying to hang out.  Under a hanging basket of fruit, for instance.  The fruit flies will go in, forcing their way through the holes toward those enticing smells, but won’t usually come back out again.  It’s too hard to find their way out, too hard to get through holes pressed inward, and there’s not much motivation when the inside smells so deliciously like rotting fruit.

8. Every night or so, put the container in the freezer for a while to kill the fruit flies.  Then, take it out and let the fruit thaw to do its work all over again.

Works beautifully.

Enjoy your tomatoes!  And don’t forget to vote in the Best of Western Washington food blog contest.  Voting stays open until October 12th.

You can use this button:

We're Competing badge

Read Full Post »

I’ve written before about eggs:

~ Why eggs are good for you,

How to pick out eggs,

~ Why eggs contain the important vitamin K2 MK-4 when they’re from chickens raised on pasture, and

~ How small-farm eggs are more nutritious overall.

So, you know there are lots of reasons to eat eggs, other than that they’re cheap and delicious.  And that anyone trying to tell you eggs are bad for you is misguided.

Today, we’re highlighting instead the versatility of the humble and delicious fried egg.  Sure, fried eggs are great for breakfast and brunch.  On top of some smoked-paprika home fries with vegetables (hmm, maybe I should give you that recipe) and with a side of greens or breakfast sausage, they’re one of my favorite things to eat.

But you’ve probably noticed I stick fried or poached eggs on top of a lot of my dishes.  The spring vegetable gratin.  The Thai basil chicken.  The rice bowl with ikura (salmon eggs) and vegetables.

It’s gotten me thinking: What wouldn’t be better with a fried egg or two on top?  Probably most desserts.  Fruit would be pretty weird.  Um…  I’m having trouble thinking of other examples.

Meats?  Delicious.  Rice dishes?  Absorb the egg yolk — yum!  Slow-cooked or lightly cooked vegetables?  Yes. French fries, of course: cooked in beef fat and dipped in the broken yolk of an egg.  A salad?  Actually, yes. Pizza? Egg is a classic addition in Italy, as it is on meaty pasta dishes. Thai food? Very traditional to add a fried egg on top; my college cafeteria in Chiang Mai had a tray of them ready to toss on for 5 baht more.  What about soup?  Poach it right into the soup and break the yolk as you eat to thicken the broth.

In some of these cases, the egg might feel like overkill, but in many it’s a great addition.  And you get some more good fat and vitamins in your meal, along with that extra quick-to-make deliciousness.

I took the classic caprese salad (tomato, mozzarella, basil) and added some fresh eggs from our house’s new chickens (check out those nice orange yolks!).  So tasty.  You can even make your own mozzarella if you’re feeling so compelled (instructions here).

Okay. I want your ideas. What else unexpected is made better with an egg on top? What else would be spectacularly weird?

~

Caprese Salad with Fried Eggs

per person:

  • 1-2 eggs
  • butter
  • 2-3 fresh summer tomatoes (or more)
  • mozzarella, fresh — as much as you’d like
  • basil
  • olive oil
  • salt
  • pepper
  • vinegar (balsamic, blueberry, raspberry, fig, apple cider, whatever)

1. Cut tomatoes in slices or wedges

2. Slice mozzarella.

3. Drizzle with olive oil and vinegar. Sprinkle on salt.

4. Fry eggs in butter, letting yolks stay runny if you like to. A tip: sprinkle a spoonful or two of water into the pan when the eggs are halfway cooked and cover immediately. Helps the whites cook fully and not burn. Take off the heat fairly soon after.

5. Add eggs to salad. Tear basil leaves on top and grate pepper over the whole thing. Serve immediately.

Read Full Post »

Zucchini Crust Pizza!

When I wrote about cauliflower crust pizza, reader Sarah tipped me off on the Seattle Local Food Facebook page to another idea: zucchini crust. Apparently it’s a trick she learned from her grandmother.

Grandmother-approved and grain-free? I had to check it out. If it was as delicious as it sounded, it could be the ultimate cure for too-much-zucchini season.

It works just like the cauliflower crust, only you pre-shred the zucchini raw, and drain out its excess liquid, whereas you mash the cauliflower after cooking it. If you have a food processor with a top shredding blade, assembling this crust is fast and easy. The whole pizza-making process is actually pretty quick.

The result is a thinner crust than the cauliflower, with a nice chewiness. A wetter topping such as tomato sauce can make it a bit soggy, but tastes so good that I don’t mind. Pesto works really well too. I used some of the nettle pesto from my freezer on one pizza. Delicious.

The pizza above has tomato sauce, fresh mozzarella, extra parmesan, fresh yellow tomatoes added at the end, and a sauté of garlic, onion, Italian parsley, and king oyster mushrooms. Any mushrooms will do.

About the crust proportions: You can really vary them, as long as there is enough egg to bind the other ingredients together, enough cheese to brown, and enough zucchini (with water squeezed out) to give it character. More cheese will make a crispier, browner crust.

Okay, too-much-zucchini season: Bring it on. My toppings are ready.

~

Zucchini Crust Pizza!

This recipe can be doubled.

For the crust:

  • 1 large egg or 2 small ones
  • About 3 small-medium zucchinis (mine were about 8″)
  • 1.5 cups grated parmesan or mozzarella. I liked parmesan best for this one.
  • salt

See note above about how you can vary these proportions according to your taste, your desired crispiness, etc.

For the toppings:

Use anything you like on a pizza. General formula:

  • Mild tomato sauce OR pesto
  • Grated firm mozzarella cheese OR sliced fresh mozzarella cheese
  • Ricotta cheese or goat cheese, for small dollops on top (optional
  • Assorted vegetables. Pre-sauté for extra flavor, especially if you’re using onion, garlic and mushrooms. A little italian parsley or basil is nice too; the basil can be added fresh after the pizza is cooked, and the parsley is nice in the sauté. Finely chopped greens are nice. Fresh tomatoes can be added after the pizza is cooked too.
  • Meat if you like/eat meat on pizza: Crumbled sausage would work well. Pre-sauté. Ground lamb or chicken would be tasty, cooked with lots of garlic.
  • Olive oil, black pepper

Directions:

1. Preheat the oven to 450 degrees.

2. Grate the zucchini.

3. Sprinkle salt on the zucchini and stir. Let it sit a few minutes.

4. Squeeze the water out. I found the easiest way to do this was to wrap it in cheese cloth or butter muslin and squeeze. You can also put the zucchini on one plate and press another plate on top of it, or put it in a colander and press a bowl into it.

5. Mix with egg and grated cheese.

6. Spread parchment paper on a pizza stone or baking sheet. Spread out your dough batter about 1/2 inch thick into a circle.

7. Put it in the oven and cook until it has browned, about 15-20 minutes. Meanwhile, as it is cooking, sauté any toppings you want cooked. I sautéed garlic, onions, mushrooms and Italian parsley.

9. Take the browned bottom crust out of the oven and admire it.

10. Cover it with your toppings.

10. Bake again until crust edges brown further and cheese on top melts into toppings. Take out of oven and add drizzled olive oil, grated black pepper, and optional fresh tomatoes and fresh basil. Serve hot.

We're Competing badge

Read Full Post »

Rosh Hashanah and the holidays that follow mark the season of sweet foods.

I don’t have much of a sweet tooth, and try to avoid sugar, but there is, as they say, a time and place for everything.  This is the season for my grandmother’s plum cake.

The first rule of this plum cake: Use more plums than you think is reasonable.  The top should be covered entirely in plums that have been cut in half.  And yes, you can use pluots or apriums or whatever color or flavor of plum you like.  Just make sure they’re delicious.

Edited to add: I just spoke to my grandmother and she says apricots are also marvelous in this recipe.  You can even halve them, freeze them, and make this cake in winter.

The original recipe calls for regular flour.  I’ve made it gluten-free with a blend of rice flour and nut flour.  It works great with either almond flour or hazelnut flour.  The last two nights, I’ve used local hazelnut flour, probably my favorite baking ingredient (after butter).

Make this to celebrate fall, to break fast on Yom Kippur, to eat on Sukkot, to sweeten Shabbat Shuva (tonight) or just to use up all those plums that have been attacking you from your plum tree (or the one down the block/in the park/in your friend’s yard).

And when you eat it, wish sweet things, and strength and health this year, for my grandmother in return.

Grandma’s Holiday Plum Cake

  • 1 cup sugar (I’ve used white or brown.  You can also reduce the sugar but it’s necessary to have some for the cake’s crumb)
  • 1/2 cup butter (one stick)
  • a dash of vanilla (optional — you can also try almond)
  • zest of one lemon or orange
  • 1 cup flours: I combine rice and hazelnut (or almond) in a proportion of either 1/2 cup of each or 3/4 cup rice to 1/4 cup nut.  Fluff or sift.
  • 1 teaspoon baking powder (you can sift into flour)
  • pinch of salt, unless you’ve used salted butter
  • 2 eggs (beat with fork to mix)
  • 6-8 large, or 12 small, plums or pluots, halved and pitted (I like to use different kinds/colors for aesthetics and flavor)

Topping (optional):

  • a few spoonfuls of sugar mixed with 1 tsp or more cinnamon and (I added) cardamom
  • lemon juice

Preheat oven to 350F.

1. Cream sugar and butter until light.

2. Add eggs, one at a time.  Add vanilla and zest if using.

3. In a separate bowl, mix flours baking powder, and salt.  Mix in gently but thoroughly.

4. Spoon the batter into a buttered 9-inch springform pan.

5. Cover the top entirely with the halved plums, skin side up.  Sprinkle lightly with topping mixture and lemon juice.  You can skip the topping too.

6. Bake at 350 degrees for about 1 hour.  Remove and cool.  Remove sides of spring form pan but leave cake on the bottom part.  Refrigerate or freeze if desired, or cool to lukewarm and serve plain with vanilla ice cram or whipped cream (which Grandma prefers).

To serve frozen torte, defrost and reheat briefly at 300 degrees.

Yield 8 servings.

We're Competing badge

Read Full Post »

It’s been a rough week.  Sometime in the last few months, my grandmother was diagnosed with early-stage pancreatic cancer.  About a week ago, she wanted to give up.  She wasn’t eating enough or drinking enough.  She didn’t want the (mild but still unpleasant) chemo treatments anymore.  She didn’t want anything, or to see anyone.  She just wanted to close her eyes and be gone.

My grandmother is one of my heroes.  She’s generous to a fault, buying Costco chickens for a neighbor who likes them, and driving him to the senior center when he can no longer drive.  She mothers everyone, instantly delights small children, charms people who meet her.  She’s also a hell of a cook and a baker.

I didn’t know what to do.  I sent her a Rosh Hashanah care package: a card I’d painted, some photos from the summer, some apples, some honey, a honey cake.  I messed up the honey cake recipe (although don’t tell her; she actually told it to me wrong a few years ago), but I decided to send it anyway as a sign that she needed to stick around to help her granddaughter become a less incompetent baker.  Even while telling me she liked the package and still felt terrible, she still paused to tell me I’d done the honey cake wrong and try to figure out what I’d messed up.

Finally, I flew down to LA to see her.  This was a hard decision.  She said she didn’t want visitors; I was going against her wishes.  I’d stay somewhere else, drop in if she wanted me.  She said she didn’t want me to cook for her; her (amazingly wonderful) home health nurse was doing that.  She didn’t want me to bring her anything.

I saw her and at first she was negative.  She didn’t want me to think of her as anything less than vital.  But she’ll always be impressive to me, no matter what. This is the woman who just a few months ago, at 89, passed her driver’s test, was taking classes, was talking to vendors at her farmers’ market.  She’s amazing, however long she lives, however physically strong or weak she feels.

After we’d sat for a few minutes, she started asking me about my new house, my community.  She said she liked my dress.  She laughed when I thought of funny things to tell her.  She fussed over me.  She said it was good to see me.

Before I left today, I stopped at the Santa Monica farmers’ market and picked up all her favorite produce.  I stopped by her house to drop it off, made sure the tomatoes looked nice enough.  They did.  She thanked me for coming.

She’s feeling more positive again.  Trying rehydration.  Wanting food.  Tentatively retrying chemo.  I’m incredibly grateful.  Things will be what they will be, but the better she feels and does, the happier I’ll be.

A lesson in all this.  I show love through food, cooking for family, for beloveds, for dear friends, for strangers.  Each of these is an act of love.  I couldn’t cook for her here; I had to let go of that and just buy ingredients.  But what a joy to pick out the most delicious peaches, the best tomatoes, the nicest head of lettuce for my grandmother, to tempt her while following her wishes and letting her be in charge.  This is love.

Shanah tovah to those celebrating (and Eid Mubarak to those celebrating).  Sweetness and health to you this year.

Thanks to Josh Liba for the flickr creative commons picture.

Read Full Post »

(I’ve had some requests to revisit and repost this recipe from my old site [archive].  Here it is!)

A former roommate had a tradition of hosting pizza parties, at which she’d provide dough and friends would bring toppings.  I wanted to participate, but don’t eat gluten and try to limit my grain intake a bit.

Luckily, over at Low Carb Examiner, I spotted a recipe for a cauliflower pizza crust, the brainchild of Jamie VanEaton.  The crust is made only of cauliflower, eggs and mozzarella, with some optional herbs and spices.  No flour, no grains, no gluten.  I bought some cauliflower, mozzarella, and eggs, and I set to work.

It works beautifully.  It’s not bread, but it has the same kind of browned edges and foldable softness a doughy crust has.  Even better, it’s filling without giving me the bloated, tired feeling I get from eating all the white flour in a traditional pizza crust.  The cauliflower flavor is subtle and appealing.  It’s nice to have another cauliflower recipe, since I love cauliflower and frequently cook with it.

You don’t have to be gluten-free or even a cauliflower fanatic to adore this pizza.  I brought some sample slices out to the crowd of party-goers and asked for honest opinions.  Positive scores all around, especially on pizza 2.0 whose crust I allowed to get a little browner.

Everything in this pizza was local, except for a little olive oil and black pepper.

I’m impressed with the ingenuity and creative simplicity of a bunch of recipes I’ve found on Low Carb Examiner.  Jamie has a knack for coming up with low-carb versions of savory carb-heavy comfort foods, but without the kind of substitutes you see in some alternative-ingredient foods, like additives or processed ingredients.  She uses simple substitutes like cauliflower, which appears again in the tasty-sounding lasagna and enchiladas.  Also, check out her jicama hashed brownsnacho chips made of zucchini, egg and cheese, and a zucchini version of her pizza crust.

Cauliflower Crust Pizza: All local and gluten-free

For the crust:

  • 1 egg
  • 1 cup cooked, mashed cauliflower
  • 1 cup grated mozzarella
  • Optional: herbs or seeds.  The original creator of this recipe used fennel, oregano and basil.  I kept it plain and focused on the toppings.

For the toppings:

  • Mild tomato sauce or purée
  • Grated mozzarella cheese
  • Ricotta cheese, for small dollops on top
  • Assorted vegetables.  I used sautéed onions and chanterelles, fresh button mushrooms, basil, fresh small summer squash, and fresh tomatoes
  • Optional: olive oil, black pepper

1. Preheat the oven to 450 degrees.  (Mine was at 500 and worked fine; I was sharing the oven with other pizzas.)

2. Cook cauliflower until it’s soft.  Use whatever method you prefer: steam, boil, roast, pressure cook, whatever.  Mash it up with a ricer.  Mix in egg and mozzarella.

3. Grease a baking sheet or line with parchment paper.  If using a pizza stone, cover it in aluminum foil and then put down parchment paper.  Spread out your dough batter about 3/4 inch thick and eight or nine inches wide.  (I doubled the batter but still baked it as two separate batches.)  Let it brown, about 12-15 minutes.

4. Take it out and cover it with your toppings.  Bake again until crust edges brown further and cheese on top melts.  Serve hot.

Pictures:

The crust from the first version, although I preferred the browner second crust.

The first pizza:

The second pizza:

Read Full Post »

I’ve published a recipe for madeleines before, another gluten-free one using honey, almond meal and lavender.  They were tasty, low-grain, low-sugar, and full of delicious lavender from Sequim.

But the holy grail madeleine I was after kept evading me: the hazelnut madeleine.

I buy hazelnut meal from Holmquist Hazelnuts (U-district farmers market or Pike Place), and it’s my favorite thing to bake with.  It’s rich and almost chocolatey, fatty and tasty.

But every time I tried to make madeleines out of it, they came out too dry.  The hazelnut meal seems to be dryer than almond meal.

Finally, for a local foods French cooking workshop I did at my house, I came up with this recipe.  The proportions work beautifully.  The secret: More eggs.

Serve on their own, dip in cream (or cream mixed with honey/vanilla/rum/whatever you like), or dip in dark chocolate and allow to cool.

~

Hazelnut Madeleines (gluten-free)

  • 4 eggs
  • 1/2 cup hazelnut meal
  • 1/3 cup rice flour
  • 1/3 cup sweetener — sugar gives the best crumb, but honey or maple syrup also work.  (You can also reduce the sugar, but this is already pretty low)
  • dash of vanilla extract
  • dash of almond extract
  • 1/2 teaspoon baking powder
  • 5 Tablespoons butter
You need a madeleine pan to make this recipe.  Although you could also use the batter in a ramekin or something like that; it just wouldn’t be a madeleine.
.
1. Melt butter (microwave or stove top) and set aside while doing the next steps.
.
2. In a standing mixer, beat eggs on high until it starts getting thick and white, at least a minute.  Slowly pour in the sweetener and let it beat at least another two minutes.  Add the vanilla and almond extracts and let it beat another thirty seconds.  Your mixture should be very thick and pale.
.
3. In a separate bowl, mix together the hazelnut meal, rice flour, and baking powder.
.
4. Take the mixer bowl out of the stand mixer, and gently pour in the flour mixture.  With a rubber spatula, fold in the dry mixture to the egg mixture.  Then, drizzle in the butter, and very gently fold it in with the rubber spatula until it’s completely incorporated.
.
5. This is important: refrigerate the mixture for at least thirty minutes.  This changes the consistency of the batter: it starts getting firm and bubbly, the way a good mousse is.  This will help the shape and consistency of your madeleines.
.
6. When you’re ready to bake, preheat the oven to 400 F (about 205 C).  Butter your madeleine pan and sprinkle it lightly with rice flour.  Take your batter from the fridge and stir up any separated parts from the bottom.  Gently place spoonfuls of batter into the molds, just barely filing them.
.
7. Bake 8-10 minutes until they’re golden; watch them carefully.
.
8. Gently turn them out onto a cooling rack and let them cool only slightly before devouring them.

We're Competing badge

Read Full Post »

Western Washington residents know we’ve had some early-fall cold and wet weather this past week.  But in honor of the changing skies — today and tomorrow should be warm and sunny — I’m giving you an insistently summer salad.  It’s all stuff that should be at the peak of ripeness at the markets right now.

The motivation for this salad came from some wonderful fresh ricotta I’d bought from the Broadway Farmers Market (Willapa Hills).  We were looking for a bright, fresh side dish to an oxtail stew, and we were looking to do something with the ricotta other than just caving and eating the entire tub with spoons.  There were also very ripe tomatoes, and two contrasting colors of basil: Italian green and dark purple.

Inspired by picking a plum hanging over the sidewalk that took some acrobatics to reach (it was worth it), we decided to add some of the yellow plums we’d bought from Jones Creek Orchard, adding a sweet and tangy element.  Some sliced up fresh fennel for crunch and flavor, a sliced lemon cucumber, and a little lemon juice, olive oil and pepper later, we had a perfect summer salad.

Enjoy the upcoming warm weather, have a picnic, and eat like it’s still summer while you still can.

~

Insistently Summery Salad

  • Several very ripe tomatoes (at least some dark red, other colors great too)
  • Several very sweet yellow plums
  • 1 small, young head of fennel
  • A few sprigs green Italian basil
  • A few sprigs dark purple basil
  • 1/2 cup ricotta
  • 1 lemon cucumber
  • lemon juice, olive oil, and pepper to taste

1.  Cut tomatoes in wedges.  Discard stems.

2. Cut plums in wedges or slices.  Discard pit.

3. Remove outer layers and inner core (if not very young) of fennel.  Chop remaning white and fresh, crispy parts of green into thin slices.

4. Slice or chop lemon cucumber

5. Tear basil leaves

6.  Combine above ingredients.  Sprinkle with lemon juice, olive oil, and crumbled ricotta.  Stir gently to combine flavors.  Grate fresh black pepper on top.

Serve with any summer meal: Meats, fish, beans… Would go especially well with grilled tuna.

Read Full Post »

I wrote a few posts ago about some arguments for local eating, including the abundance of varieties we just don’t get from industrial-level agriculture.

Plant diversity means increased chances climate tolerance and disease resistance, (sometimes) extra nutrition, and lots of delicious things to taste. But I forgot to say one thing about those abundant varieties, which is that they sometimes look really cool.

Take summer squash.  You know about zucchini and yellow squash and patty pan.  But have you ever tried tromboncino?  Italian for “little trombone,” these guys, a curved-neck, slender, pale green squash, often reveal a remarkable flower pattern when you cut open the wide end:

Pretty, isn’t it?  They’re also really sweet, but not sugary sweet, and flavorful. And we’ve entered the time of year when summer squash is abundant, so I’m sharing one of my favorite, simple ways to eat them.

Yes, even the stunted plants that were unhappy about a long, cold June are finally producing.  Squash the size of baseball bats, squash the size of tiny slugs, all sizes and sorts of summer squash demand, “Okay, you grew/bought me.  Now what?” Marge Piercy had some suggestions in her famous poem Attack of the Squash People, but I’ve got another:

Breakfast.

We don’t often think of squash for breakfast.  It’s a dinner food, a lunch food, a sautéed on the side food.  But squash for breakfast is marvelous.  It cooks very quickly, and has a sweetness that is brought out when paired with breakfast sausage or, as in this dish, with eggs and a slightly bitter goat cheese.  Add some ripe tomatoes and you have a delicious, colorful breaakfast that takes about five minutes to prepare. Fast enough for a weekday, delicious enough for a weekend, and impressive enough to share.

One of many nice things about this dish: The squash can be used to sop up the extra egg yolk in place of bread.  The flavors are also really well balanced — a bite of tomato makes you want more cheese, a bite of cheese makes you want more squash, the squash goes well with a bite of egg…

If you don’t have tromboncino, this also works well with very young yellow squash.  You do want the small summer squashes for this dish, though.  Save the big ones for ratatouille or stew or something like that.

.

Tromboncino Summer Squash with Eggs, Tomatoes and Goat Cheese

1-2 squashes per person, depending on size

2 eggs per person

1-2 very ripe summer tomatoes per person

a few crumbles/slices of goat cheese per person, preferably soft-ripened, but fresh chevre will work too

Butter and olive oil, salt and pepper

1. Slice squash into pieces about 1/8″ to 1/4″ thick

2. Heat a bit of butter and olive oil in a frying pan that has a lid.  Add squash.  Sauté until soft.  Add a little more butter.

3. Crack eggs over squash.  Let cook about 30 seconds to 1 min.

4. Add a spoonful or two of water, and then cover with the lid until the egg whites are cooked but the yolks are still soft.  Transfer immediately to a plate.

5. Slice tomato on top in wedges.  Crumble on cheese.  Add pepper.  You can also drizzle on a little olive oil.

Read Full Post »